Lesson 3: How to throw using the glide method
Objectives:
- The student will understand how to perform the glide step
- The student will be understand the importance of a proper release angle
- The student will understand the differences between throwing with power position and throwing
Activity 1: Read & Discuss
- Students will read about how to perform the glide step then make a blog post talking about the advantages and disadvantages of using the glide method in comparison to the power position
Reading:
Author: Mike Rosenbaum
Source: Mike Rosenbaum is a sports radio commentator and a member of the track and field writers of america
QUESTIONS: (LOCATED UNDER THE LESSON 3 DISCUSSION BOARD TAB)
1. Explain the steps of gliding and form and what do you think is the trickiest step?
2.Why do you think the glide throw allows the thrower to throw farther?If you disagree then state your reasons why.
Activity 2: Video Instruction
- This video will reinforce the reading by demonstrating how perform the glide step

Activity 3 Gliding to success
In this lesson the student will practice the glide step as discussed in the earlier lesons.
Directions:
1. Practice releasing the shot at a 45 degree angle as previously discussed in the lessons earlier.
2. Go through the steps of the glide on your own being sure to look at the video for help.
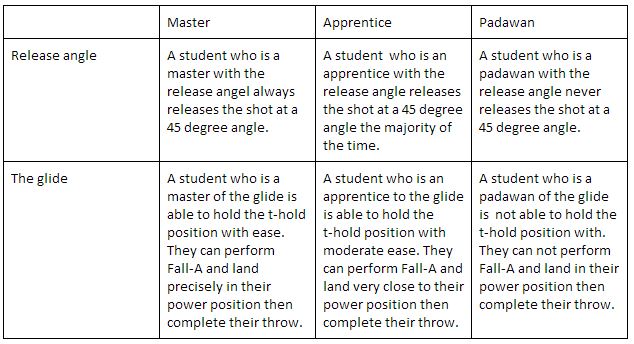
3. Use the chart below will track your progress.
In this lesson the student will practice the glide step as discussed in the earlier lesons.
Directions:
1. Practice releasing the shot at a 45 degree angle as previously discussed in the lessons earlier.
2. Go through the steps of the glide on your own being sure to look at the video for help.
3. Use the chart below will track your progress.